
Creating an engaging timeline in PowerPoint can sometimes feel daunting. You want to present your information clearly and attractively for your all-hands meetings, retrospective meetings, or professional presentations. However, finding the right template or knowing how to design one from scratch can be a challenge. Luckily, PowerPoint offers multiple ways to simplify this process, ensuring your timelines are both professional and visually appealing.
In this blog, we’ll cover 4 effective methods to create a PowerPoint timeline template. From utilizing built-in templates and exploring external resources to using creative transitions and live annotations, we’ll guide you through each approach to help you choose the best fit for your presentation needs.
4 Novel Ways to Creating a PowerPoint Timeline Template
1. Using PowerPoint’s Built-In Templates
Did you know PowerPoint has a vast library of templates at your fingertips?
With over a thousand templates available, you can easily find the perfect PowerPoint timeline template with no hassle. Best of all, these templates are included with your Office 365 subscription and require no additional downloads.
- Open the PowerPoint app.
- On the left sidebar, click on “New”.
- In the search bar, type “timeline” and press Enter.
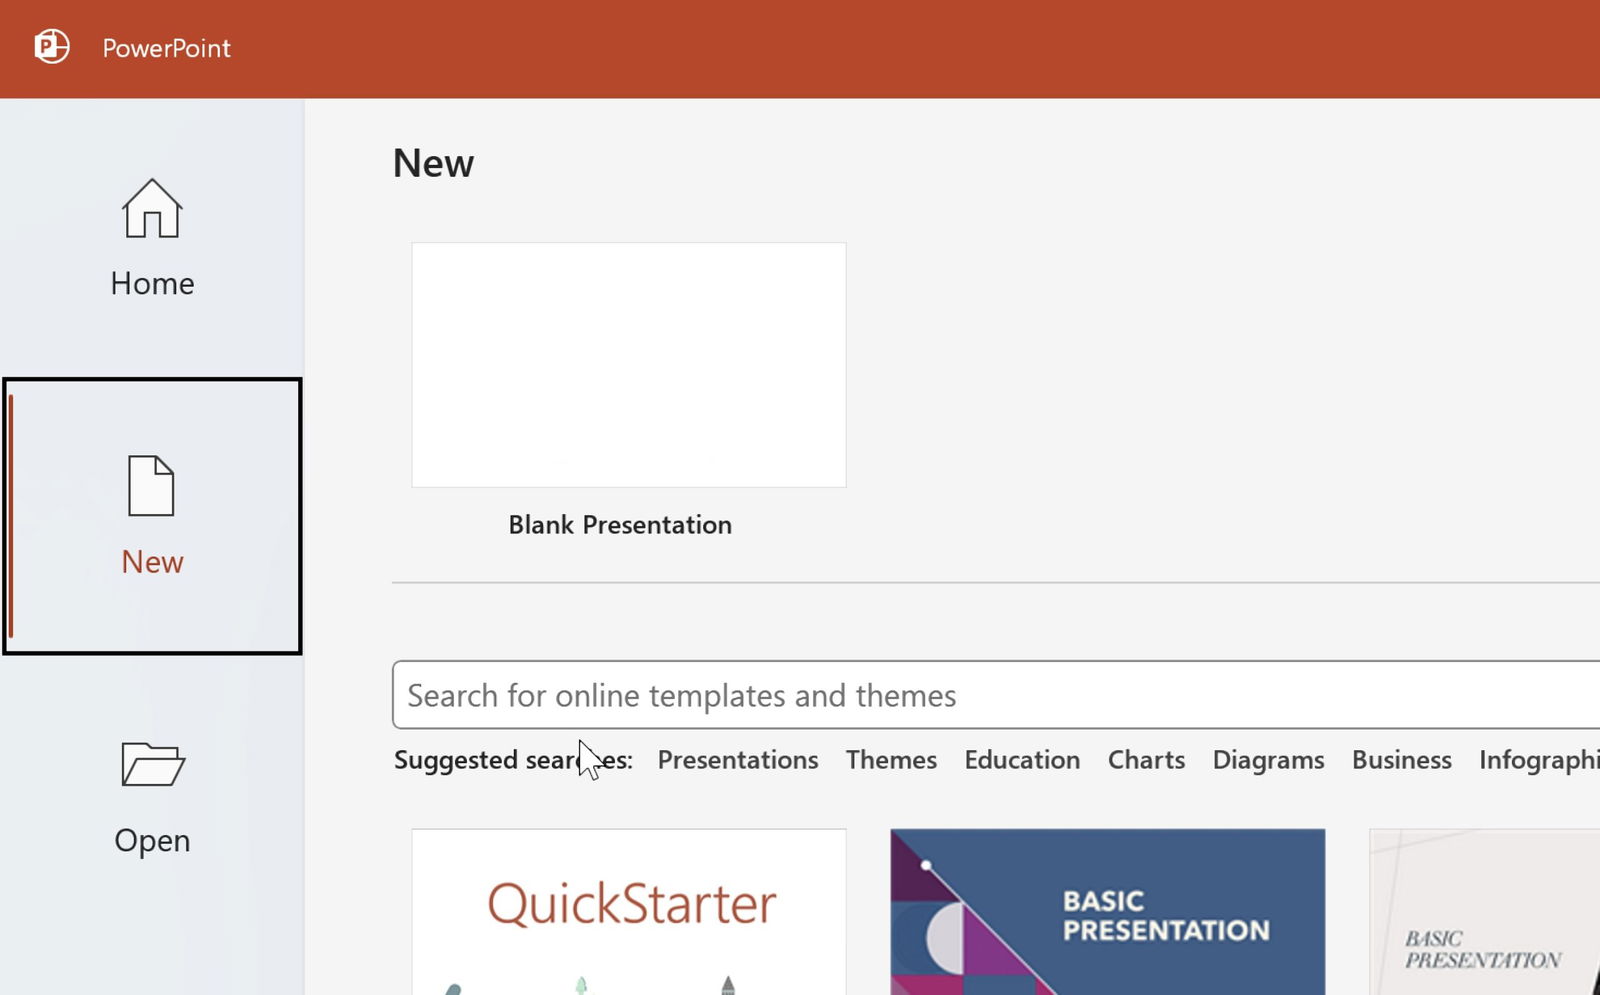
- Wait a few seconds for the search results to appear, then select a template you like.
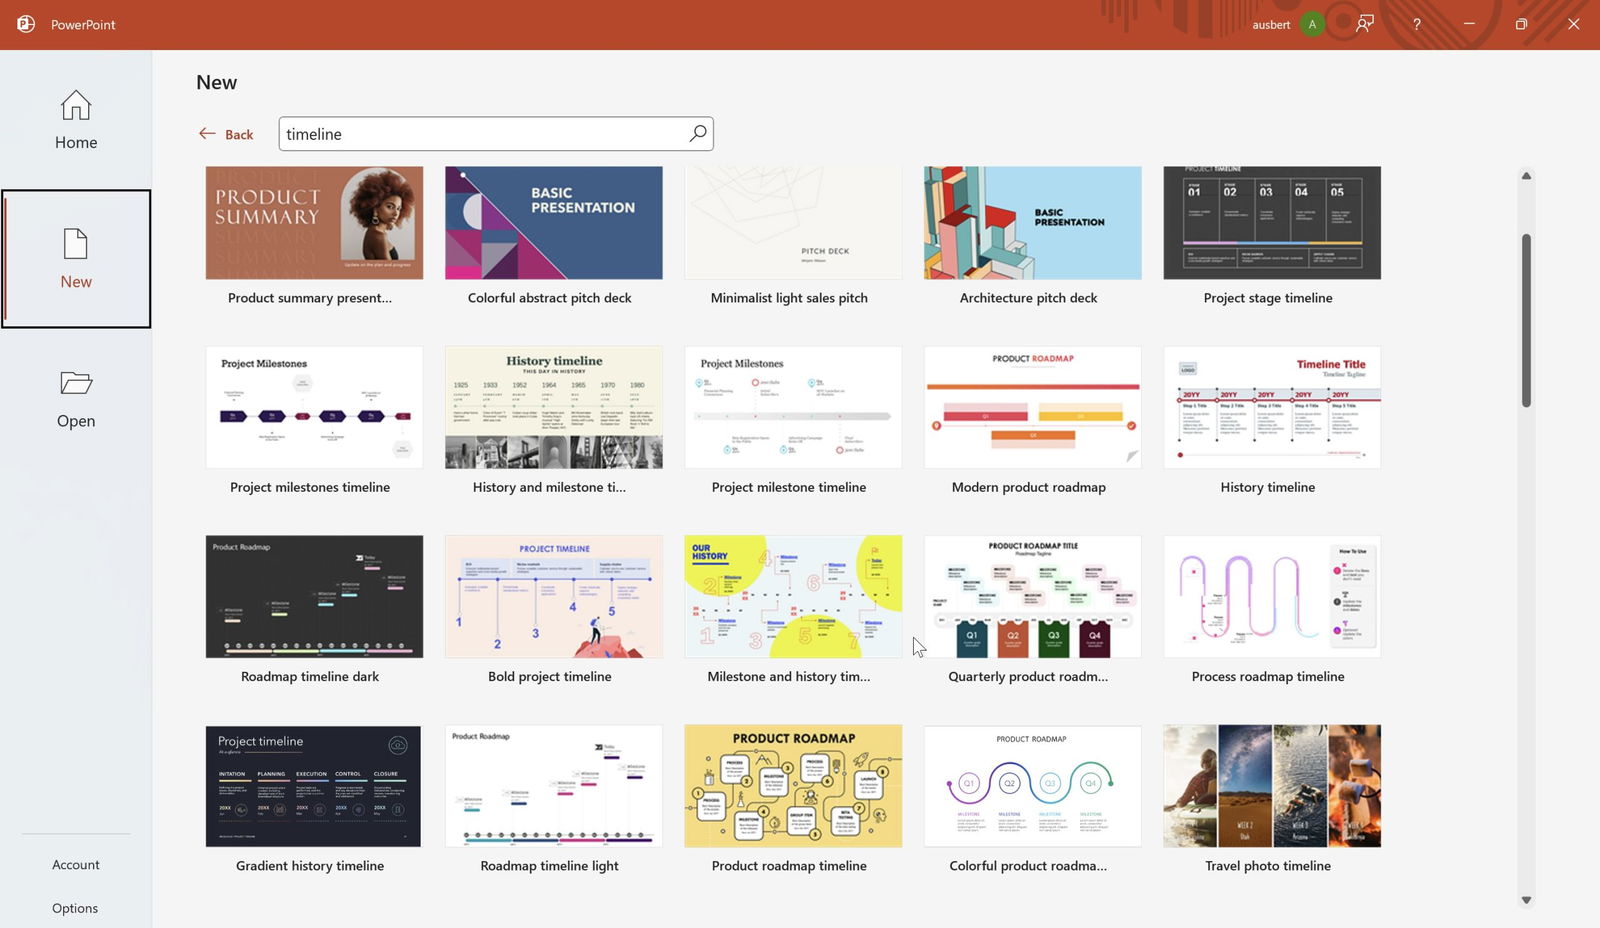
- Preview the template by clicking on it and use the left and right arrows to browse through the options.
- Once you find the template you prefer, click “Create”.
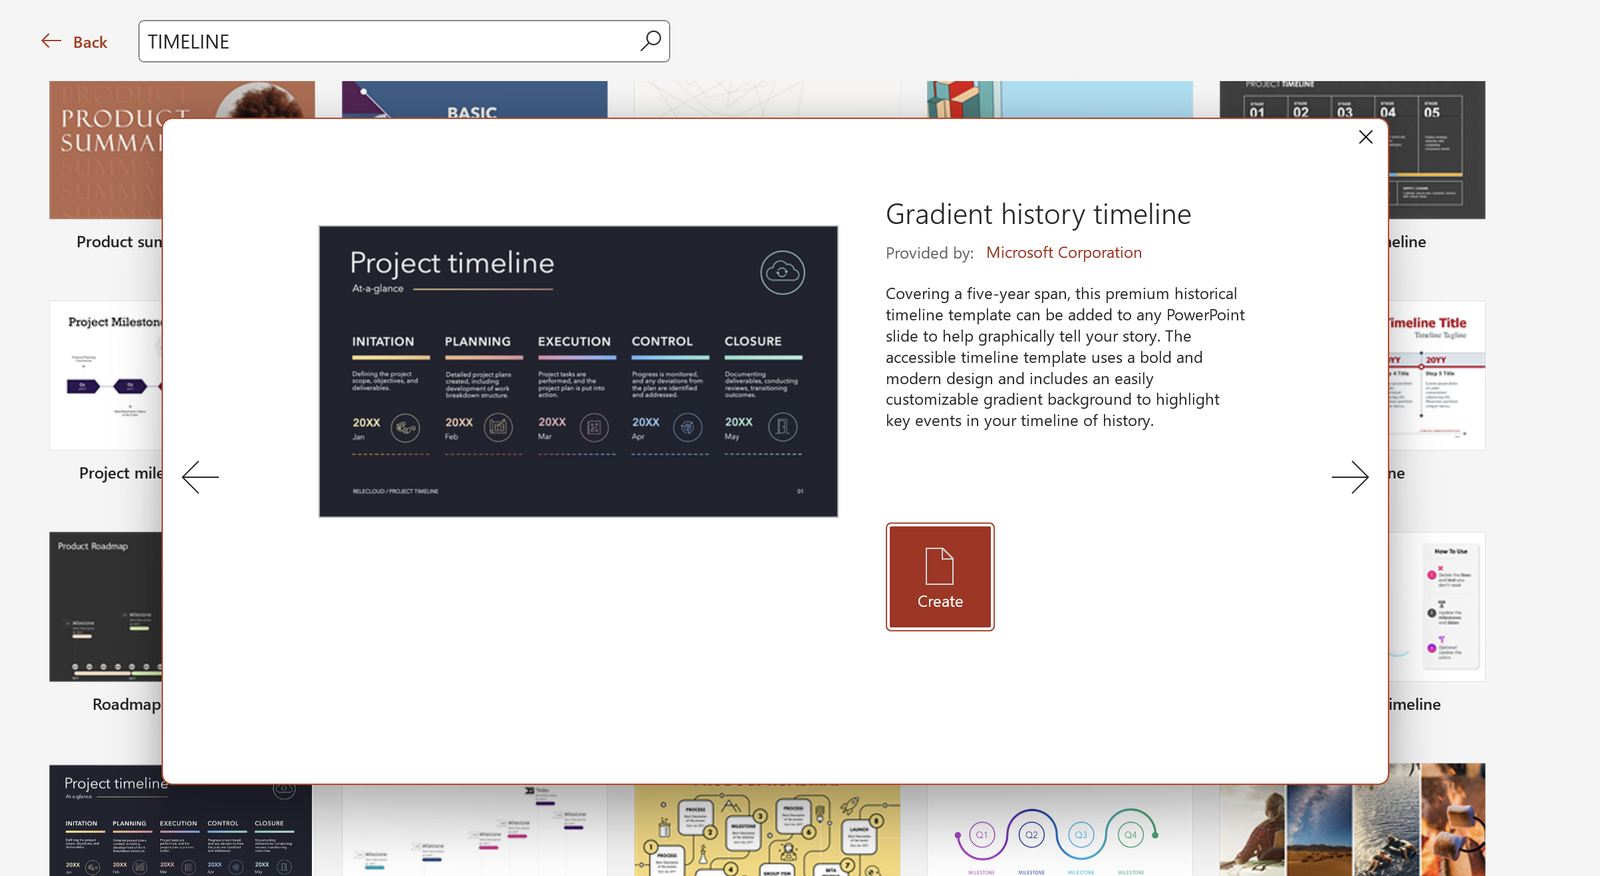
- And, that’s it! Customize the template to meet your presentation needs.
Most templates offer color customization options, allowing you to choose the perfect fit for your presentation.
2. Using Slide Template Resource Websites like Slidesgo, SlidesMania, and SlidesCarnival
Numerous websites offer a wide range of PowerPoint templates, making it incredibly convenient to find the perfect design. With just one click, you can download a template and be ready to go, saving you time and giving you access to creative designs you might not have thought of yourself. Among our favorites, Slidesgo stands out as the best. Here’s how:
- Visit Slidesgo.
- Use the search bar to type in “timeline” and browse through the results.
- Click on a template to preview it. If you like what you see, click the “Download” button.
- Select the PowerPoint option when prompted.
- Once downloaded, open the template in PowerPoint.
- Edit the template to fit your presentation’s needs.
Most template resource websites follow a similar process for choosing and downloading templates, making it easy to explore different platforms.
Popular Slide Template Resource Websites
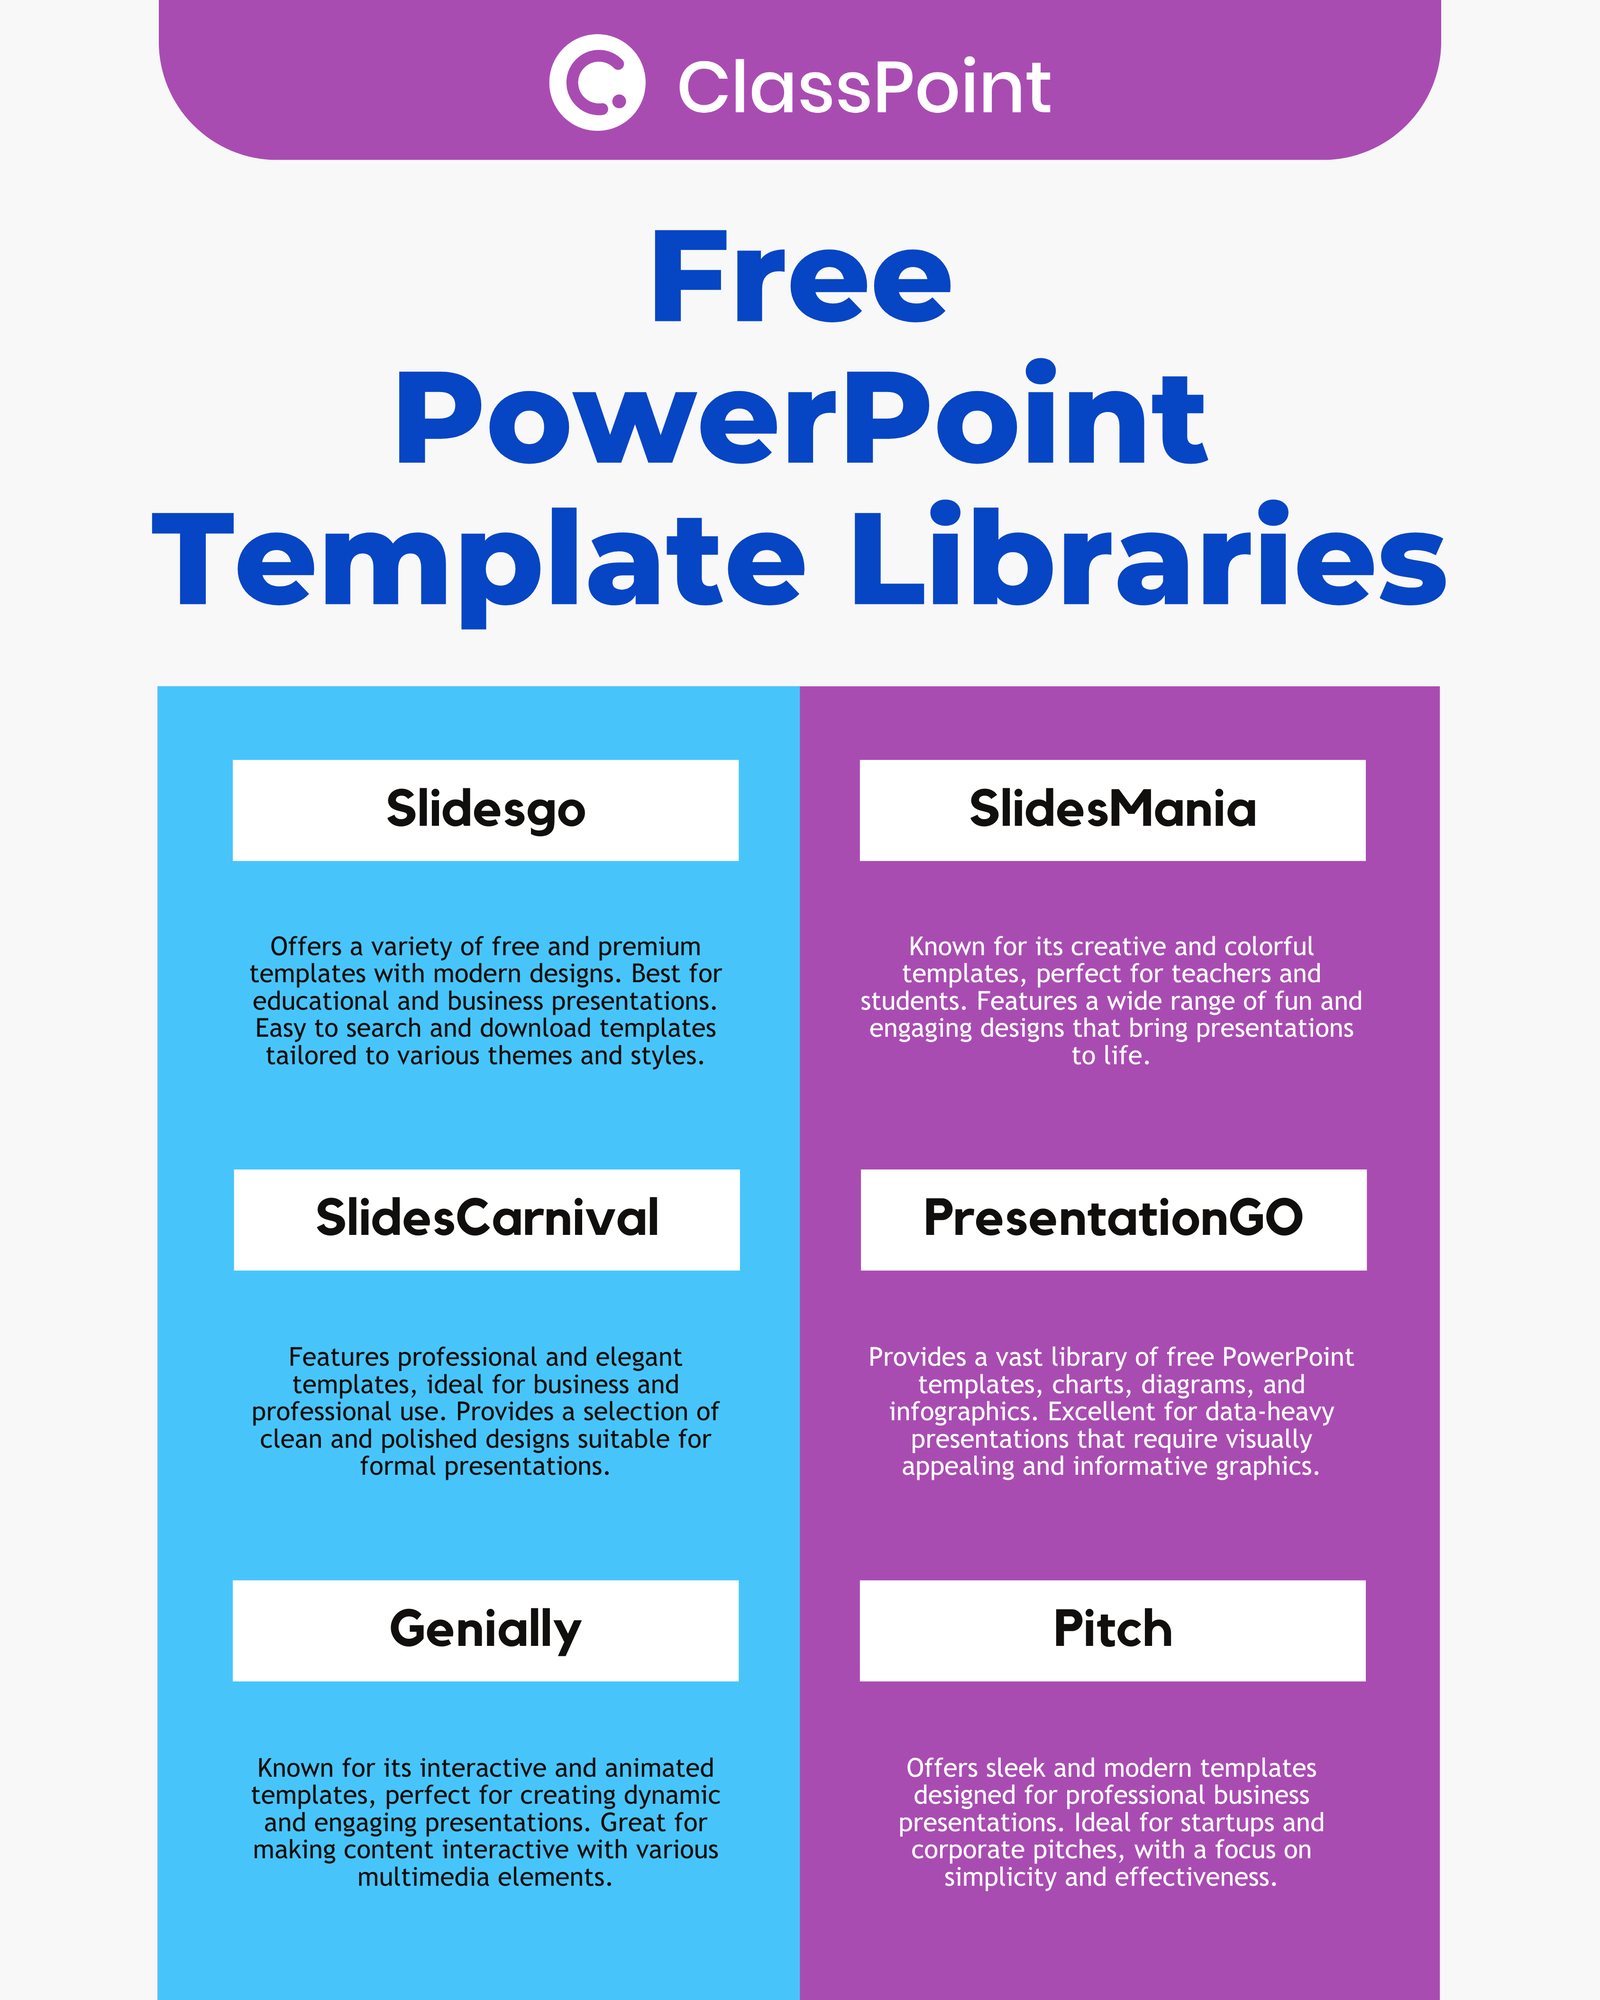
- Slidesgo: Offers a variety of free and premium templates with modern designs. Best for educational and business presentations. Easy to search and download templates tailored to various themes and styles.
- SlidesMania: Known for its creative and colorful templates, perfect for teachers and students. Features a wide range of fun and engaging designs that bring presentations to life.
- SlidesCarnival: Features professional and elegant templates, ideal for business and professional use. Provides a selection of clean and polished designs suitable for formal presentations.
- PresentationGO: Provides a vast library of free PowerPoint templates, charts, diagrams, and infographics. Excellent for data-heavy presentations that require visually appealing and informative graphics.
- Genially: Known for its interactive and animated templates, perfect for creating dynamic and engaging presentations. Great for making content interactive with various multimedia elements.
- Pitch: Offers sleek and modern templates designed for professional business presentations. Ideal for startups and corporate pitches, with a focus on simplicity and effectiveness.
These resources provide a wide range of templates to suit different presentation needs, making it easy to find the perfect design for any project.
3. Creating a Creative Timeline Template Using Transitions like Morph
For a more creative and unconventional approach, you can use PowerPoint’s Morph transition to create a dynamic timeline. This method allows you to animate transitions between slides, making your timeline visually engaging and unique.
In this example, we’re doing a 4-point timeline:
- On a blank PowerPoint slide, lay out 8 rounded rectangles – 4 positioned in one row, and the other 4 just below them.
- Right-click on the 1st rounded rectangle and select “Format Shape”.
- In the side panel that appears, under the Fill dropdown, select “Picture or texture fill”.
- From here, you can either insert a photo from a file or paste from your clipboard. Use a photo or illustration that best accompanies that specific point on your timeline. For this example, insert pictures of the inventors themselves.
- Fill each of the remaining 3 rounded rectangles in the row with pictures.
- Once done, place the other 4 rounded rectangles on top, covering each photo.
- On top of these rectangles, add your text, and proceed to group them into each rounded rectangle.
- Duplicate the slide 4 times.
- On the 2nd slide, slightly tilt the 1st rounded rectangle to the right and reposition it diagonally to the right downwards. This reveals the 1st photo behind.
- On the 3rd slide, do the same for the 2nd rounded rectangle, and so on, until the last slide.
- Once everything is set, select all the slides. Go to the Transitions tab and apply Morph.
Download the Free PowerPoint Morph Timeline Template here 👇
PowerPoint Morph Timeline Template
Download and Present with this Interactive Morph Timeline template!
Try our Decision Tree PowerPoint template, Roadmap PowerPoint template, and Org Chart PowerPoint template.
4. Creating a Live, Interactive Timeline using ClassPoint‘s Slide Show Annotations
For a unique and engaging approach, you can create a live timeline during your PowerPoint slideshow as if you’re writing on a whiteboard. With ClassPoint’s live slide show toolbar, you can create live annotations and insert whiteboards without leaving PowerPoint or exiting the slide show, ensuring a seamless presentation throughout. This method keeps your audience engaged and involved in the timeline-making process.
- Sign up and install ClassPoint
- First, download ClassPoint, and the Inknoe ClassPoint tab will appear in the PowerPoint ribbon.
- Start your presentation in slide show mode. You’ll find a toolbar with various features to make your presentations dynamic and interactive. For this example, we’ll focus on whiteboards and live annotation tools.
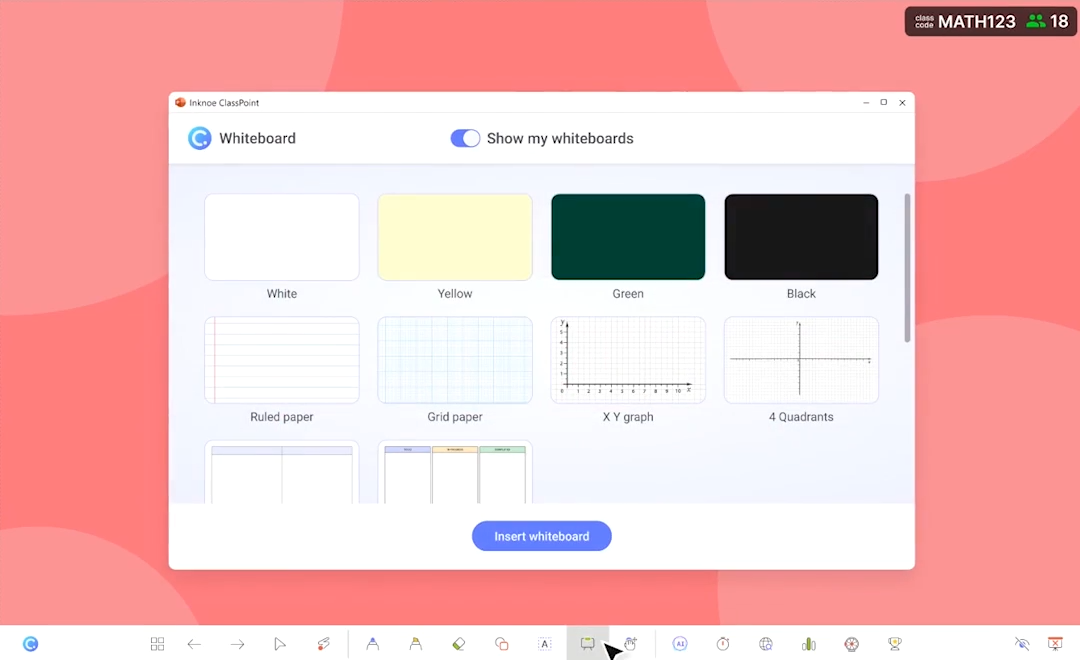
- Insert a Graph Paper Whiteboard
- Use a graph paper backdrop from ClassPoint’s default whiteboard collection to make it easier to draw straight lines.
- Click on the Whiteboard icon in the slide show toolbar.
- Select “Graph Paper” and insert it.
You can create custom whiteboards, which will be saved for easy reuse later. Learn more with this short video tutorial.
- Draw Shapes Live
- With ClassPoint’s live annotation toolbox, you can draw shapes on your slide without exiting the slide show to edit mode.
- Click on the Shapes icon and start drawing live.
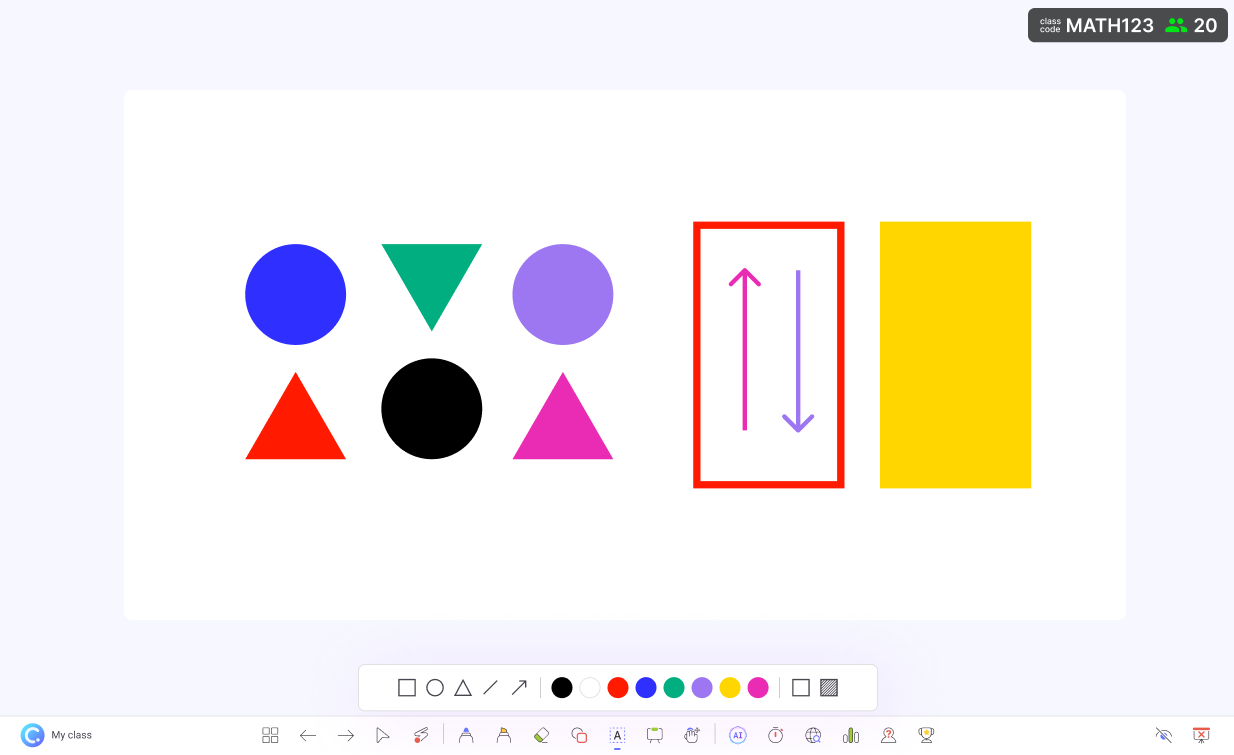
Explore the available customizations for colors, forms, and texture fills to enhance your timeline.
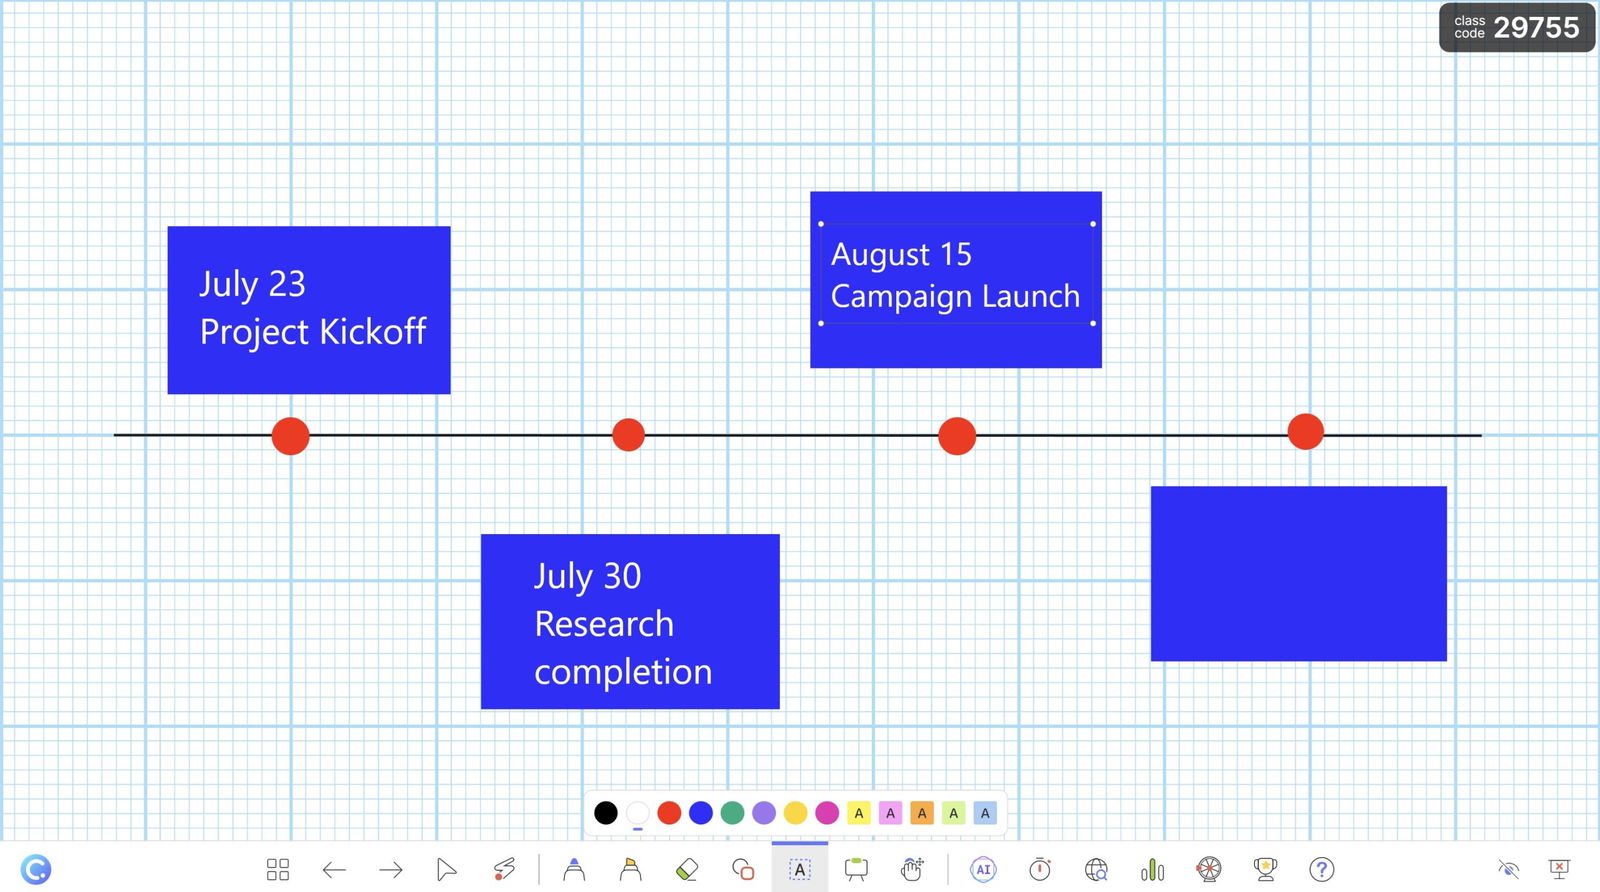
- Add Live Text
- Use ClassPoint’s live text box to make your presentation more dynamic and interactive.
- Click on the Text Box icon and start typing in text live during the slide show.
Download this free Interactive PowerPoint Playbook for more free templates👇
Interactive Puzzle PowerPoint Templates
Master the tricks to turn your PowerPoint into an interactive experience today!
Food for Thought
Creating a timeline in PowerPoint doesn’t have to be a tedious task. With the right approach, you can turn a simple timeline into a visually stunning and informative part of your presentation. A well-designed timeline not only conveys information effectively but also keeps your audience engaged and interested.
Remember, the tools you use are just a starting point. Your creativity and the way you present your information will ultimately make your timeline stand out. Embrace the process, experiment with different styles, and have fun with it. Your audience will appreciate the effort and the clarity your timeline brings to your presentation.
